Course list http://www.c-jump.com/bcc/
Media examination within EnCase 6/7 is organized into cases.
Case management involves creation and usage of the following folder structure on forensic examiner's computer:
cases case001 case001 ... caseNNN evidence export index temp reports images caseNNN.Case
The structure is designed to to maintain a set of unique folders for every examination.
The lab must maintain separate folder for each investigation.
The .Case file contains all configuration parameters:
search hits
bookmarks
hash analysis
signature analysis
In EnCase 7 multiple files are used within the case folder.
Evidence file extensions are
E01, .E02, ...
Internal organization of the evidence files is:
Header -- acquisition-time parameters:
Case info, acquisition date/time, acquisition notes, examiner's name,
Sequence of the data blocks:
Data block
CRC checksum
Acquisition hash of the source media -- has no relation to the evidence file itself.
Click File -> New Case.
Specify folder locations.
Save the case under the designated folder -- not at the default location!
Use Save button frequently!
Evidence Files can be added to the case at any time via:
(a) Add device button on the button bar, or via
(b) File -> Add device Menu.
IMPORTANT: use write blocker, hardware (preferred) or software-based.
Also, you can then
right-click on the added device in Tree Pane, and
create the evidence file via Acquire option. You will have a chance to replace the device by the acquired image.
See EnCase Lesson 3, page 31 for details.
(c) Right-clicking on Evidence Files in Tree Pane and then New.
Navigate to the evidence folder and follow the rest of the dialog box prompts (see EnCase Lesson 12, Adding Evidence to a Case.)
Use blue selection check marks to select the evidence you wish to add.
Only need to add .E01 (.E02, .E03, ... files are added automatically.)
NOTE: Same support provided for SafeBack image file format, .001, .002, ...
Click Entries, go to Table View, switch to In Report by right-clicking.
Click Report in detailed view, the acquisition hash is displayed there.
Verify hash.
NOTE:
If MD5 hashes don't match - reimage!
It is important to capture the initial directory structure of the examination media.
Click the green Home plate of the media.
Go to Report view, right-click and Export.
NOTE: be sure to create a designated reports folder on the examiner's machine.
When finished, uncheck the Home plate.
MBR -> 64-bytes of Partition Table -> 16-byte Partition Entry (or unpartitioned space.)
VBR is in the first sector of any partition.
NOTE: Deleted partitions may contain a lot of evidence; see EnCase Lesson 23 for details.
Click on the volume such as C: in the Tree view.
Right-click and choose Recover Folders.
While recovery process is in progress, don't do anything else -- let it finish.
Be sure to Save the case after recovery is complete.
EnCase searches unallocated space for
on NTFS volume -- $MFT entry records and rebuilds the file system content from there.
on FAT volume -- directory entries, designated by "." and "..", followed by file and directory entries.
See EnCase Lesson 23, pages 238-240 for details.
Executing signature analysis gives you advantage in seeing all graphic files in Gallery view, regardless to what the current file extension is.
Click Search button.
Uncheck all options except Verify file signatures.
Click Start.
See EnCase Lesson 14 for details.
Click View menu, then File Signatures.
Set green Home plate to show all items.
Examine the Signature column:
!Bad - unrecognizeable file type for its extension.
*[Alias] - file with renamed extension was successfully recovered
Match - original extension matches the original file type
Unknown - unrecognizeable file type/extension
Unallocated space may contain a lot of evidence.
The task is to locate such data and document the findings.
Typical searches:
ASCII and UNICODE text strings (e.g. user names, logon names, passwords, other keywords)
A particular file signature.
See EnCase Lessons 9 and 21 for details.
IMPORTANT: The rest of the examination steps depend on the scope of the Search Warrant, or written/verbal consent.
Circumstantial Evidence:
If examination yields evidence outside of the scope of the current warrant (such as images of CP or other contraband) -- stop the search and obtain another warrant.
How many images to ignore before obtaining the second warrant?
-- Between 6 and 10.
FAT stores local times
NTFS stores UTC times
UTC == Coordinated Universal Time - a successor to GMT
GMT == Greenwich Mean Time, absolute time reference and doesn't change with the seasons
Summer Time == Daylight Saving Time
Winter Time == Standard Time
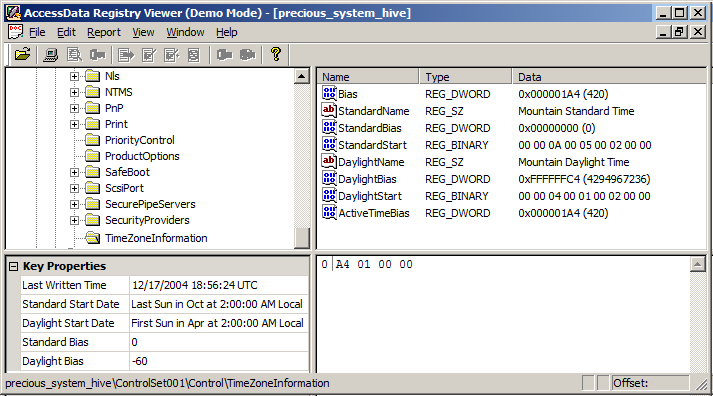
Time Zone Info:
StandardName: time zone name
StandardStart: month, week, day, and time of day when the transition from daylight saving time to standard time occurs. Usually Oct/Nov
StandardBias: usually zero; the bias in munutes during standard time period. Can be ignored.
Bias: the current time zone offset from GMT, interpreted as GMT-Bias (minutes). This is the difference between GMT and current local time.
ActiveTimeBias: time zone offset from GMT including DaylightBias, interpreted as GMT-ActiveTimeBias (minutes)
Daylight Saving Time Info:
DaylightName: daylight saving time description, e.g. "PDT", Pacific Daylight Time
DaylightStart: month, week, day, and time of day when the transition from standard time to daylight saving time occurs.. Usually Mar/Apr
DaylightBias: offset in minutes added Bias to form the current bias during daylight saving time. Usually -60.
Case Processor is an automated way to find data and bookmark the findings.
In EnCase 7 it is launched from the Evidence Tab.
In EnCase 6 it is launched from under EnScript->Forensic->Case Processor
To start, right-click and then click Run
It first asks for the Bookmark folder. Some scripts also export data, which requires the Export path.
NOTE: often you need to double-click the item to specify additional options.
EnScript->Forensic->Case Processor
Specify "Time Zone Info" when asked for the Bookmark folder.
Proceed to Modules->Case Initializers->Windows Initialize Case and select this module.
Double-click Windows Initialize Case to display additional options.
Select Timezone.
Click OK, the module will run.
When finished, go to Bookmarks tab, locate "Time Zone Info" bookmark, and switch to Report view to see the results.
Go to Cases->Entries->Home and change the time zone settings for each device: right-click and then Modify time zone settings...
For more information see EnCase Student's Guide Lesson 27, pages 298-302.
At the bottom right corner, click EnScript -> Forensic -> Case Processor -> Information Finders
Right-click File Finder and select Run.
When dialog box opens, checkmark the case name.
Choose the Bookmark folder name.
Open File Finder.
Double-click for options and select desired file types in the Input Parameters tab.
Choose Recovered Graphics, All Files, and click Finish.
At the bottom right corner, click EnScript -> Forensic -> Case Processor -> Information Finders
Choose the Bookmark folder name.
Double-click Find Protected Files to select the desired file types.
When dialog box opens, checkmark the case name.
The script creates bookmarks for encrypted files, such as Office, ZIP, etc.
Use Report view to interpret the bookmarked results.
You can also highlight the bookmark and instantly switch to Entries; this will show you the location of the actual file. Sometimes it may be an email attachment, which may appear to be inside a compund file, such as DBX.
Checkmark Windows Initilize Case.
Double-click to show the options.
When asked to specify the name of the installed software -- select all.
Click Finish.
This will recover installation history of applications, device drivers, and more.
This search locates Client-Based Email, resulting from using email applications installed.
To begin, click the Search button.
Select Search fot email and select all available email sub-types.
(Additionally, you can also checkmark Search for Internet History.)
Click Start.
The results of the search are located under
Cases -> Records -> Home in the Tree view.
Outlook express stores individual emails and email attachments in DBX files on the client's machine.
DBX files are compount files, so they can be mounted via View File Structure option available on the short-cut menu.
In the Records subtab, the Report view will display email headers, the message, and attachments.
See EnCase student's guide, Lesson 31, for details on Bookmarking emails and attachments.
With thousands of emails on the computer, the Records Conditions allow to filter and narrow down the list of emails.
In Cases -> Records -> Home, click Set Include Option icon (Page 376)
Click Filter Pane -> Conditions tab.
Double-click desired attribute and specify additional information.
To deactivate the condition, click the "minus" Query button which appears on the Toolbar (Page 376)
Internet History includes temp files and cookies.
To begin, click Search button.
Checkmark Search for Internet History.
Click Start.
The results of the search are located under
Cases -> Records -> Home in the Tree view under a particular Browser name.
See EnCase student's guide, Lesson 31, pages 379-387 for details.
The content of web-based email is in Temporary Internet Files.
Click Tools menu -> Webmail Parser... (Page 377)
The results are located under
Cases -> Records -> Home in the Tree view under "C", if this is the volume name where the search was executed.
Click on the search hit of your interest, for example, an email message.
Highlight desired content in the text view below.
Right-click the selection and click Bookmark Data.
Use Text/High Ascii bookmark type.
Specify the bookmark folder as appropriate, such as Evidence, etc.
Click OK.
Click Cases -> Entries -> Home in the Tree view.
Locate folders and files with images, use green homeplate as appropriate.
In the Table view, switch to Gallery.
Use blue-checkmarks to select items that you want to bookmark.
Right-click in the Table view area and choose Bookmark Data.
Select Bookmark Selected Items and specify the appropriate bookmark folder, such as Evidence, etc.
Click OK.
Click Cases -> Bookmarks -> Home in the Tree view.
Right-click on a specific bookmark in the Tree view, and choose Edit...
Select fields as necessary by double-clicking on the available fields and other items in the dialog window.
Be sure to select Show in report and Show Pictures as necessary.
Click OK.
In the Table view, switch to Report.
Export by right-clicking anywhere on the report.
Go to Disk View in the Table pane.
Select MBR -- the first sector of the drive (sector 0.)
First VBR is usually on the 64th sector of the drive, which is sector 63.
In detail view, switch to Hex.
In hex view of MBR, go to offset 446. EnCase status bar should indicate:
PS 0 SO 446 PO 446 LE 64
NOTE: there should be MBR/VBR signature in two bytes that follow the partition table: 55 AA. Basically, the signature is in last two bytes of the 512 bytes of the sector.
Right-click the selection and click Bookmark Data.
Select Partition Entry bookmark type.
See figure 23-5 on page 224 of the EnCase student's guide.
In Tree view, click Entries -> Home.
In Table view, click the drive, or volume, or unused disk space.
In Detail view, click Report for each selection.
The report includes sizes of partitions and unused disk space.
Next, switch to the Disk View in the table pane, and click on the last observable sector. The status bar will indicate PS number, which can be used to calculate the size of the drive by adding one and multiplying the result by the sector size, 512.
The next step is to compare the result with the size indicated on the manufacturer's label on the back of the hard drive.
Using info provided by Partition Entry bookmark, go to the VBR of the existing partition. In many cases this is PS 63.
The 8 bytes at VBR sector offset SO 40 will contain the size of the partition.
Highlight the 8 bytes, right-click and click Go To.... using the Little Endian selection option, observe decoded decimal value of the partition size, in sectors.
Recall that MBR partition table entry also indicates partition size. The VBR value is one-less, because last sector of NTFS partition contains a backup copy of the VBR.
EnCase treats backup copy of the VBR as Volume Slack.
Follow step-by-step instructions on pages 230-237 of the EnCase student's guide.
In brief, the steps are (example using CBarrow.E01 image):
In Tree view, click Entries -> Home.
In Table view, click Volume Slack.
In Table view, switch to Disk view. You should be looking at PS 3894911.
In Detail view, click Hex -- this displays 512 bytes of the NTFS backup VBR sector of the volume C:
Observe VBR signature "NTFS" at sector offset 3 from the beginning of the sector. Also, observe 55 AA at the end of the sector.
In Table view, switch to Disk view. Move to the next sector, PS 3894912.
Observe again that sector 3894912 conains 55 AA signature at the end of the sector. However, this is not a VBR, because no label such as NTFS, or MSWIN4.0, or MSWIN4.1, or MSDOS5 is present at the beginning of the sector.
Therefore, this is likely a sector that contains an extended partition information.
In detail pain, in hex view of this sector, go to offset 446, and select the 64 bytes of the extended partition table.
Right-click and bookmark the selected extended partition table as Partition Entry bookmark.
Observe the results. The first entry indicates a FAT32 volume beginning at PS 3894975.
Using Table view/Disk view, go to sector PS 3894975.
In Detail view, observe MSWIN4.0 label at the beginning of sector 3894975, as well as 55 AA at the end of the sector.
In Table view, Disk view, right-click on the square of sector PS 3894912, and select Add Partition.
Accept the defaults and rebuild the volume.
In Table view, Disk view, right-click on the square of sector PS 3894912, and remove the partition.
EnCase allows to build a library of hash sets.
EnCase uses MD5 hash algorithm to compute unique fingerprints for particular files. Copies of the same file will have the same MD5 value.
For example,
OS Files: a hash set for well known operating system files can be built to separate operating system components from the user's applications and data.
Contraband Files: known CP images hash set can be built to check disk drives if they contain contraband files.
Unathorized Applications: a hash set for an application known to be used for illegal purposes (e.g. copying cell phone SIM cards) can be created.
Unathorized Files: an organization computer use policy may require that the employees do not install unathorized software on corporate computers, including laptops.
EnCase Hash Library:
-> hash set category (s/b always Known or Notable.)
-> hash set name (e.g. Contraband.)
-> hash set name
-> ...
-> hash set category
-> hash set name
-> hash set name
-> ...
-> ...
EnCase restricts its automated scripts to the following two categories:
Known: refers to files that the examiner wishes to exclude from examination, e.g. Microsoft Office software files.
Notable: refers to files that the examiner wishes to find, e.g. hacker software or image files.
The examiner can edit the categories after hash sets were created, if necessary:
View -> Hash Sets -> right-click and Edit a particular hash set.
Search -> check Compute hash value. This generates MD5 fingerprints for all allocated files.
Select (blue-check) files to be included in a hash set. Right-click in the table view area and click Create Hash Set...
NOTES:
Some directories (e.g. on FAT volumes) will have logical size zero and will be excluded from the hash set.
On NTFS, directories maintain logical size; therefore, they will be included in the hash set.
Specify hash set name and category.
NOTE: Hash sets are inactive until (1) they are selected, and (2) the hash library is rebuilt!
View -> Hash Sets -> Select (blue-check) desired sets -> right-click in the table view area and click Rebuid Library...
The Library is shared between cases. Click Search -> check Compute hash value and execute this on any blue-check-selected files that you wish to analyze. Use Selected items only option in the search box as necessary.
As a result of the search, the hash values, hash set names, and hash set category columns are indicated in the table view pane of the allocated files. Use green home plate selection to flatten the view as necessary.
Follow Lesson 15, page 157 of EnCase Student's guide to learn how to apply filters on computed hash sets and how to document the findings.
Evidence Processor (EP)
options |
Execution
Steps |
View
Results |
Additional
Steps |
PE Recover Folders | Only for FAT and NTFS |
Entries Tab
Tree View Panel .Lost Files .Recovered Folders |
|
PE Expand Compound Files | Includes ZIP, DOCX, etc. | ||
PE Find Email | Search for specific email storage files PST/PBX/MBX etc. | Records Tab |
Evidence Tab In Table View right-click and View File Structure |
Webmail:
PE File Carver Carve HTML Carve Webmail Files |
Records Tab | ||
PE Find Internat Artifacts
Search Unallocated Space |
Parses index.dat of IE and similar files of other browsers | Records Tab | |
Evidence Tab | Filter... | Results Tab | View a subset of evidence items |
Search Tab
Index Search Use AND and OR logic. See Encase Help for additional query options |
Uses transcript of PDF and other compound files |
Search Tab
Results Tab In the bottom View area, use Find Next Previous Item Next Item to iterate through the matching items. |
Use green Play button
to execute index query.
Note that results are displayed in the Search Tab but also duplicated in the Results Tab. Supposedly, the results tab appears "less cluttered" |
PE Keyword Search
or Evidence Tab Raw Search |
Global keyword search. Keyword are saved in the case cache |
Search Tab
Keyword hits Results Tab |
Use green Play button
to execute keyword query.
The keywords must be selected to be included in the query |
Entries Tab
Tree View Selected Items |
Raw Search
allows to search selectively inside the evidence tree. See textbook p 354 for details. Options: Search Entry Slack allows searching for FAT32 directory entries and inside file slack Search Initialized Size for NTFS only. Searches only what user would see in the file. Undelete Entries Before Searching searches across cluster boundaries |
Search Tab
Keyword hits Results Tab |
Use green Play button
to execute keyword query.
Note: the keywords must be saved in a separate .keyword file The keywords must be selected to be included in the query |