CIS-255 Home: http://www.c-jump.com/bcc/c255c/c255syllabus.htm
This tutorial explains how to create a C++ class representing a GUI window, its widgets, and callbacks.
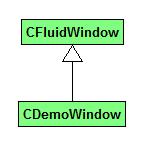
In this tutorial, we generate code for the CFluidWindow class, using FLUID, and then derive our own class, CDemoWindow, which definnes the callback functions for the widgets:
FLUID creates a complete user interface class, including constructor and all necessary member functions.
Start FLUID program:
fltk-1.3.2\fluid\fluid.exe
(or fluidd.exe if you made a debug build.)
Use menu
File/New
to create a new project.
Create fluid_project subdirectory under your C++ source directory.
Save the project by clicking
File/Save As
and save the project under fluid_project subdirectory. Specify CFluidWindow.fl for the file name.
This writes the FLUID project file with extension .fl on disk. It is best to keep the FLUID files in a dedicated project subdirectory, such as fluid_project in our case.
Define a class by clicking the menu
New/Code/Class
Name the class CFluidWindow and leave the subclass blank.
Once added, the CFluidWindow class becomes visible in the FLUID browser window.
You can view the C++ code for the FLUID project by clicking
Edit/Show Source Code
Select CFluidWindow class in the project tree.
Add a new function by selecting
New/Code/Function/Method
FLUID understands that we want a constructor when the function name is the same as the class name. So we enter
CFluidWindow()
Note that if you need a constructor that requires some arguments, you can enter them with the parameter list an the parenteses as usual. For example:
CFluidWindow( type1 param1, type2 param2, ... )
In most cases, the default constructor is all that's needed.
FLUID recognizes class constructor and generates the appropriate code. Make sure you declare the constructor public.
Select the CFluidWindow constructor in the project tree, and add a window by clicking
New/Group/Window
Resize the window, double-click to open the window properties, switch to C++ tab, and enter the window name, e.g. win_app in the Name: field.
Save the project.
To generate the source code, click FLUID menu
File/Save
and save the project.
Click
File/Write code
to generate the C++ source files in the project directory. The two files will be project_name.h and project_name.cxx.
Create new Win32 project in MS Visual Studio and do the following:
Add file fluid_project/CFluidWindow.cxx to the list of source files in your MSVC project.
Create CDemoWindow.h file in your project source directory:
// CDemoWindow.h #ifndef _CDEMOWINDOW_H_INCLUDED_ #define _CDEMOWINDOW_H_INCLUDED_ #include "fluid_project/CFluidWindow.h" class CDemoWindow : public CFluidWindow { public: void show() { // Make the window visible: win_app->show(); } };//class CDemoWindow #endif // _CDEMOWINDOW_H_INCLUDED_
Add main.cpp file to your MSVC project:
// main.cpp #include "CDemoWindow.h" int main() { CDemoWindow window; window.show(); return Fl::run(); }
Configure it by following the steps outlined in Installing FLTK with Visual Studio tutorial.
Compile and test the program.
Select Window win_app object in the project tree view and use the menu to add the user interface widgets as necessary.
Select Window win_app object in the tree view. Use menu
New/Text/Input
Name this input box inp_box in the Properties/C++
Note: if you add a callback function to the input box control, it is invoked when the following two conditions are met:
the input box loses its input focus, and
the input box data has changed.
Select Window win_app object in the tree view. Use menu
New/Text/Output
This creates a display-only text box, but user can select the content and copy.
Name this output box out_box in the Properties/C++
Select Window win_app object in the tree view.
To create a push button, use menu
New/Buttons/Button
or right-click on the design window and select "Button" from the menu.
Name this button btn_update in the Properties/C++, and change the label to "Update" in Properties/GUI.
Add a callback for the button in Properties/C++ and its parameter:
Callback: cb_btn_update User Data: this
The this is the callback parameter that specifies the instance of our window class, CFluidWindow.
Open CDemoWindow.h and add the callback function code:
// CDemoWindow.h #ifndef _CDEMOWINDOW_H_INCLUDED_ #define _CDEMOWINDOW_H_INCLUDED_ #include "fluid_project/CFluidWindow.h" class CDemoWindow : public CFluidWindow { public: void show() { // Specify which C++ function should Update button call: btn_update->callback( (Fl_Callback*)cb_btn_update, (void*)(this) ); // Make the window visible: win_app->show(); } static void cb_btn_update( Fl_Widget* btn, void* userdata ) { CDemoWindow* window = static_cast< CDemoWindow* >( userdata ); char const* text = window->inp_box->value(); window->out_box->value( text ); } };//class CDemoWindow #endif // _CDEMOWINDOW_H_INCLUDED_
Similar to other widgets, click FLUID menu
New/Other/Box
to add a custom widget to the window. It appears in the design view as a square box.
In the properties window for our custom widget,
Enter the name of the class, e.g. Drawing2D in the Class: field.
In the Extra Code: field enter #include "path/Drawing2D.h" to make sure that the class header is included.
If you need to add a member function to the CFluidWindow class, select the class in the project tree and click
New/Code/Function-Method
Fill in the property fields as necessary.
If your class constructor requires an initializer list, select the constructor in the project tree and click
New/Code/Code
Specify the initializer list code as needed.
We want to use FLUID designer window for any GUI stuff we want to develop, but as we add callbacks and other non-trivial initialization of our widgets, it becomes harder and harder to manage and maintain the code generated by FLUID.
Due to the limitations of the FLUID interface, when writing our own C++ code besides creation of FLTK widgets, we want to use plain old source code editor, not a maze of fancy property boxes.
Our strategy becomes:
Use FLUID to manage a class with window and widgets, but write almost no C++ code inside FLUID. To be more specific, only the class constructor remains generated by FLUID.
Make all widgets protected and derive a class from the FLUID-generated class to write all C++ code that defines the callbacks and other run-time widget behavior.
The main program can then instantiate the derived class and use its public interface to deal with the GUI window.