Course list http://www.c-jump.com/bcc/
Start FLUID program:
fltk-1.3.2\FLUID\FLUID.exe
(or fluidd.exe if you made a debug build.)
Use menu
File/New
to create a new project.
Use menu
New/Code/Function-method
to create a function.
Use default name make_window().
(If you leave the name blank, FLUID will assume that you want main() to organize your application window.)
Select the function in the tree view (officially called "FLUID browser window") and use menu
New/Code/Code...
Select (in the tree view) the function you just added.
Use menu
New/Group/Window
to add our main application window as follows:
set window name, e.g. win_app. This will create
extern Fl_Window *win_app;
declaration in the generated header file.
We can also resize the window in its design view.
Double-click on the window name to open the window properties. You can make the window resizable in the GUI properties.
Note: the property window is officially called the "widget attribute panel" in FLTK documentation.
You can add main() function directly in FLUID by using menu and leaving the function name blank:
New/Code/Function-method New/Code/Code...
For example,
int main() { Fl_Window* win = make_window(); win->show(); // NOTE: do not add this line -- FLUID appends it automatically: //return Fl::run(); }
Alternatively, you can supply your own separate .cpp file with main(). In that case,
// Adjust file name/path according to your FLUID project location: #include "fltk_fluid_generated.h" int main() { Fl_Window* win = make_window(); win->show(); return Fl::run(); }
To generate the source code for the program, click
File / Save
and save the project. This writes the FLUID project file with extension .fl on disk.
Click
File/Write code
to generate the C++ source files in the project directory. The two files will be project_name.h and project_name.cxx.
Select Window win_app object in the tree view. Use menu
New/Text/Input
Name this input box inp_box in the Properties/C++
Note: if you add a callback function to the input box control, it is invoked when the following two conditions are met:
the input box loses its input focus, and
the input box data has changed.
Select Window win_app object in the tree view. Use menu
New/Text/Output
This creates a display-only text box, but user can select the content and copy.
Name this output box out_box in the Properties/C++
Select Window win_app object in the tree view.
To create a push button, use menu
New/Buttons/Button
or right-click on the design window and select "Button" from the menu.
To add a callback, select the button, open
Properties/C++
and type
Callback: callback_button
If we want our button to do something useful, we need to attach a callback function to our button. To do this bring up Fl_Button property window by double-clicking on the button in the design window. Switch to C++ tab of the dialog box and type in the name for the callback function: callback_button (no parameters, just the name alone.)
Select the make_window() function in the tree view.
Use menu
New/Code/Function-Method
and enter the name of the callback function again,
Name(arg): callback_button( Fl_Widget* widg, void* userdata ) Return type: static void
The callback_button function is invoked when user pushes the button. We specify the return type of this function as static void because callbacks must be static (more on this in our second tutorial.)
Now we need to add some custom code to the callback function. To do that, select callback_button function in the tree and use menu
New/Code/Code...
to add C++ code to the function:
std::cout << "button click\n"; char const* text = inp_box->value(); out_box->value( text );
Select the callback function in the project tree and hit F2 to move the function to the top of the tree, so it is declared above main() or make_window(). Because we are using std::cout, we need to include iostream header in our program. To do this, select main function in the project tree and then click
New / Code / Declaration
and type
#include <iostream>
Hit F2 to move the declaration to the top of the program.
We can also add callback function for the window itself. To do this, select Window win_app in the tree view, and double-click on the window to open the properties/C++ tab.
Add callback function
callback_window_closing
This callback will be invoked when the user clicks the X button to close the window.
Follow previous steps to add the callback. For example,
void callback_window_closing(Fl_Widget* widg, void* userdata_) { std::cout << "X button clicked -- exiting the program\n"; exit( 0 ); }
Note that this code "traps" the "X" button, so if you do not call exit(), the function will do nothing except printing the message.
Note also that a cleaner way to exit the app is
win_app->hide();
instead of exit(0). The Fl_Window::hide call removes the window from the screen and quits the application in case if this was the last visible window in the application. Perhaps even a better way to exit is to form a loop:
while( Fl::first_window() ) Fl::first_window()->hide(); }
The loop makes sure all windows hide, ensuring that Fl::run() returns and all destructors are called properly.
If using the exit() call, it is asking the operating system to terminate our program immediately. To keep things in proper order, we should include cstdlib header for it to compile safely. We can do it by copying and pasting the existing #include. The new #include can be moved to the top by hitting the F2 key a few times. Similarly, we can bring to the top the callback_window_closing() function if we would like it to be defined before other funtions in the source file.
Open the properties editor by double-clicking the button on the design window. Select GUI tab and change the label to "Get data".
It may be also helpful to specify the tooltip which will appear at run-time when the mouse hovers on top of the button.
Another helpful setting is to change the properties of the window to resizable.
For the button, we can also specify the name of the control itself, to specify the name for the widget object. For example, we can type
btn_test
or something similar. The name of the widget is declared at the top of the C++ program, in the global scope.
Providing callbacks with additional "user data" is beneficial when multiple buttons invoke a single callback function.
In such case each button supplies a unique piece of data to the callback event.
The user data can be
a number, like (void*)123
a string, like "this is a test"
or any piece of C++ expression that can be cast to a void pointer
If it's a string, add it as a double-quoted string literal, for example,
"open"
To accept the second argument, we need to make sure the signature uses the second parameter,
callback_button( Fl_Widget* widg, void* userdata )
and add code that does something with the data:
const char* message = userdata; std::cout << "button click " << message;
If we test the application, we should see the message processed by the callback function.
If passing an integer, the callback function has to cast the value from void* to integer:
int value = (int) userdata;
This is a bit ugly, but we have absolutely no choice, because the callbacks are managed by the operating system, and this is the way data is managed at the OS level.
The user data can be useful when the program wants to attach the same callback function to multiple buttons, so the data can identify which widget invokes the callback. Another example is associating the same callback with different menus.
Select Window win_app object in the tree view.
Use menu
New/Buttons/Round button
and change properties/C++ class type from Normal to Radio.
Add callback named cb_radio.
Add user data in properties/C++. Use integers, for example, (void*)10, (void*)20, and (void*)30.
Add 2 more radio buttons (tip: once you add one radio button, you can then copy and paste the rest.)
Create a group for these 3 radio buttons:
Select all three radio buttons in the project tree view by using shift/down-arrow keys.
Hit F7.
Follow the usual steps to create a callback function.
Since user data that identifies each radio button is of integer type, we must cast the void* to int:
void cb_radio(Fl_Widget* btn, void* userdata) { std::cout << "radio" << (int)userdata << '\n'; }
To add a menu to our window, select Window win_app object in the tree view, and use menus
New/Menus/Menu_Bar... New/Menus/Submenu... -- name your submenu "File" New/Menus/MenuIem... -- name your submenu item "Save" New/Menus/MenuIem... -- name your submenu item "Quit"
( You can also click on the window designer, then right-click and choose same options from the context menu.)
The menu bar first appears in the window as a small rectangle, so it needs to be dragged to the top of the window and resized appropriately accross the top of our application window. When a submenu is added to the menu bar, its properties window is displayed, so we can switch to the GUI tab and change the submenu label.
Note that submenu is added by selecting the menu bar, and the menu items are added when the correspecting submenu is selected. Alternatively, we can duplicate the existing menu item in the project tree by selecting it and then hitting CTRL+C, CTRL+V to copy and paste the new menu item. As before, bring the menu item properties by double-clicking on it, and change the label as needed.
Adding callback function to the menu items can be done by selecting multiple menu items in the project tree and hitting F1 key. This brings the properties window, where the callback function is specified on the C++ tab. For example,
Callback: callback_menu
When passing the user data when the menu items are clicked, one item can pass "File/Save", another - "File/Exit". To test these strings and determine which menu has been invoked, we could add another input box to the window, name it txt_menu_test, and add code such as
const char* previous = txt_input->value(); // to get the value txt_menu_test->value("changed"); // to change the input
The code demonstrates how to read or write the contents of the text box on the input form.
Alternatively, the Quit submenu could be attached to the existing callback_window_closing function, so it can also close the applicaiton window and exit.
A tutorial using FLUID 1.1.5
http://www.gidforums.com/t-3979.html
Beginner FLTK Tutorial
http://www3.telus.net/public/robark/
Programming with FLUID
http://www.fltk.org/doc-1.3/FLUID.html
FLTK Video Tutorials
http://seriss.com/people/erco/fltk-videos/index.shtml
Erco's FLTK Cheat Page
http://seriss.com/people/erco/fltk/
Official FLTK 2.0 Documentation
http://www.fltk.org/doc-2.0/html/index.html
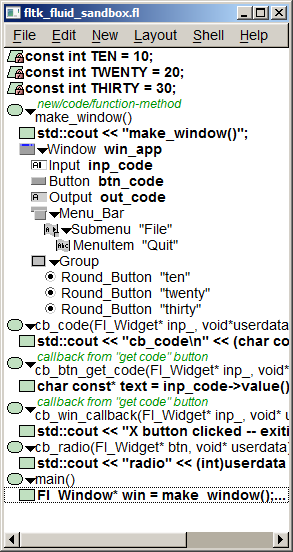
The following FLUID v 1.3.0 project ( fltk_fluid_sandbox.fl ) demonstrates complete steps of this lab:
|
|
Here is the FLUID-generated code:
// generated by Fast Light User Interface Designer (fluid) version 1.0300 #ifndef fltk_fluid_sandbox_h #define fltk_fluid_sandbox_h #include <FL/Fl.H> #include <FL/Fl_Window.H> extern Fl_Window *win_app; #include <FL/Fl_Input.H> extern Fl_Input *inp_code; #include <FL/Fl_Button.H> extern Fl_Button *btn_code; #include <FL/Fl_Output.H> extern Fl_Output *out_code; #include <FL/Fl_Menu_Bar.H> #include <FL/Fl_Group.H> #include <FL/Fl_Round_Button.H> Fl_Window* make_window(); extern Fl_Menu_Item menu_[]; void cb_code(Fl_Widget* inp_, void*userdata); void cb_btn_get_code(Fl_Widget* inp_, void* userdata_); void cb_win_callback(Fl_Widget* inp_, void* userdata_); void cb_radio(Fl_Widget* btn, void* userdata); #endif
// generated by Fast Light User Interface Designer (fluid) version 1.0300 #include "fltk_fluid_sandbox.h" static const int TEN = 10; static const int TWENTY = 20; static const int THIRTY = 30; Fl_Window *win_app=(Fl_Window *)0; Fl_Input *inp_code=(Fl_Input *)0; Fl_Button *btn_code=(Fl_Button *)0; Fl_Output *out_code=(Fl_Output *)0; Fl_Menu_Item menu_[] = { {"File", 0, (Fl_Callback*)cb_win_callback, 0, 64, FL_NORMAL_LABEL, 0, 14, 0}, {"Quit", 0, (Fl_Callback*)cb_win_callback, 0, 0, FL_NORMAL_LABEL, 0, 14, 0}, {0,0,0,0,0,0,0,0,0}, {0,0,0,0,0,0,0,0,0} }; /** new/code/function-method */ Fl_Window* make_window() { std::cout << "make_window()"; 
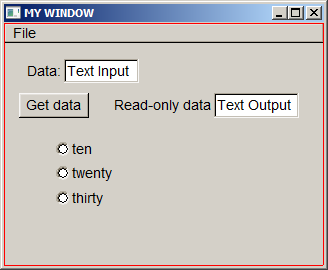
{ win_app = new Fl_Window(320, 243, "MY WINDOW"); win_app->callback((Fl_Callback*)cb_win_callback); { inp_code = new Fl_Input(60, 36, 75, 24, "Data:"); inp_code->callback((Fl_Callback*)cb_code, (void*)("input")); } // Fl_Input* inp_code { btn_code = new Fl_Button(15, 70, 70, 25, "Get data"); btn_code->callback((Fl_Callback*)cb_btn_get_code); } // Fl_Button* btn_code { out_code = new Fl_Output(210, 70, 75, 25, "Read-only data"); } // Fl_Output* out_code { Fl_Menu_Bar* o = new Fl_Menu_Bar(0, 0, 320, 20); o->menu(menu_); } // Fl_Menu_Bar* o { Fl_Group* o = new Fl_Group(50, 117, 155, 68); { Fl_Round_Button* o = new Fl_Round_Button(50, 117, 155, 18, "ten"); o->type(102); o->down_box(FL_ROUND_DOWN_BOX); o->callback((Fl_Callback*)cb_radio, (void*)(10)); } // Fl_Round_Button* o { Fl_Round_Button* o = new Fl_Round_Button(50, 140, 155, 20, "twenty"); o->type(102); o->down_box(FL_ROUND_DOWN_BOX); o->callback((Fl_Callback*)cb_radio, (void*)(20)); } // Fl_Round_Button* o { Fl_Round_Button* o = new Fl_Round_Button(50, 165, 155, 20, "thirty"); o->type(102); o->down_box(FL_ROUND_DOWN_BOX); o->callback((Fl_Callback*)cb_radio, (void*)(30)); } // Fl_Round_Button* o o->end(); } // Fl_Group* o win_app->end(); win_app->resizable(win_app); } // Fl_Window* win_app return win_app; } void cb_code(Fl_Widget* inp_, void*userdata) { std::cout << "cb_code\n" << (char const*)userdata; } /** callback from "get code" button */ void cb_btn_get_code(Fl_Widget* inp_, void* userdata_) { char const* text = inp_code->value(); out_code->value( text ); } /** callback from "get code" button */ void cb_win_callback(Fl_Widget* inp_, void* userdata_) { std::cout << "X button clicked -- exiting the program\n"; exit( 0 ); } void cb_radio(Fl_Widget* btn, void* userdata) { std::cout << "radio" << (int)userdata << '\n'; } int main(int argc, char **argv) { Fl_Window* win = make_window(); win->show(); return Fl::run(); }